Reels and other short-form videos are the best way to grow organically on Instagram right now. Regular posts mostly reach people who already follow you, while Reels get shown to people who have never heard of your business, which is how a small business account can pick up new followers and customers without paying for ads.
Instagram makes a Reel earn that reach, though. A new Reel is shown to a small group of people first, and if they watch it instead of scrolling past, Instagram keeps showing it to more people. So, how might you as a business owner keep them watching instead of letting them scroll past?
Well, whether they keep watching comes down to small things you rarely notice as a viewer, like the second of silence before anything starts happening, the video taking too long to get going, large pauses between sentences or text hidden behind the like button. You’ve probably scrolled past hundreds of Reels for exactly those reasons without even thinking about it. All of them you can fix during the editing phase of reel / short form content creation, which is exactly what we are going to cover.
If you’d like to learn to edit Reels for your business, this guide takes you through how we edit Reels for our clients, step by step.
In short, to edit a Reel you put your clips into an editor such as Premiere Pro, Edits or CapCut, cut every pause, show the hook as text on screen from the first frame, and keep something changing every second or two until the end. Then you add captions inside the safe zone, use the same fonts and colours on every Reel, and export at 1080 by 1920 so the quality survives Instagram’s compression. Of course, there is much more to good editing, but doing those things well and consistently will get you 75% of the way there.
How to Edit Reels in 9 Steps
- Set up the project in 9:16 at 1080 by 1920, with a safe-zone overlay on top.
- Build the rough cut in story order, without any polish.
- Cut every pause between and inside sentences.
- Keep something changing on screen every second or two.
- Put the hook on screen from the first frame.
- Add captions and text inside the safe zone.
- Add music and sound, with the voice clearly on top.
- Use the same look on every Reel.
- Export and check it on your phone, with and without sound.
Step 1: Set Up the Project for 9:16
Instagram plays Reels full screen and vertical, so start every Reel as a 9:16 project at 1080 by 1920 pixels. Other ratios get cropped or shown with black bars, which makes the Reel look like a repost. Edits starts every project in 9:16, in CapCut you choose 9:16 under the aspect ratio option, and in Premiere Pro you create a sequence at 1080 by 1920. Most phones film at 30 frames per second, so a 30 fps project is the safe choice, and shots filmed at 60 can be slowed down smoothly inside it.
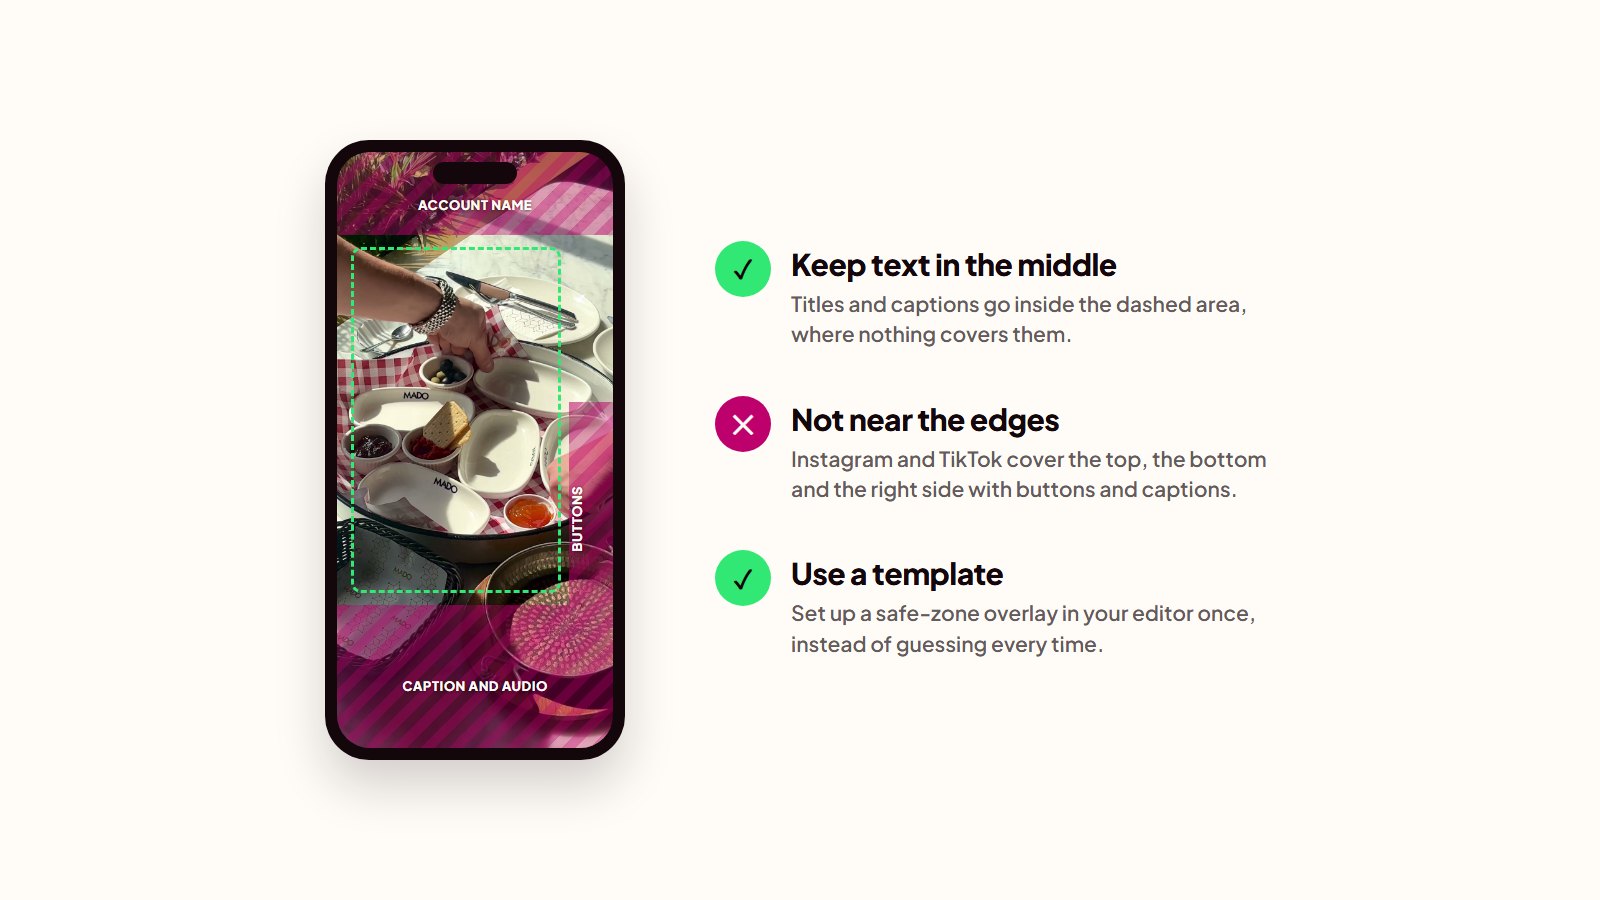
Before you add a clip, put a safe-zone overlay on the top layer at low opacity. It’s an image of the Reels screen with the areas Instagram covers marked out: the caption and profile name at the bottom, and the like, comment and share buttons on the right. TikTok, Facebook and YouTube Shorts have their own versions of the safe-zone overlay which are slightly different. You can download a free one or make your own from a screenshot of any Reel on your phone, scaled to 1080 by 1920. Switch it off before you export.
Keep each Reel’s clips, music and exports in one folder named after the date and topic, too. When a Reel does well and you want to make another version of it, which is the last step in our guide to making Reels for your business, you’ll find the footage in a minute.
Step 2: Build the Rough Cut First
The rough cut is the whole Reel in the right order without any polish: the hook, the body, the payoff and the call to action. Go through your footage once, pick the best take of each part of the script, the one where the delivery is sharpest and the first word comes quickest, and place the takes on the timeline in order.
Then watch it through and ask of every clip whether the Reel would lose anything without it. A Reel should carry one idea, and anything that drifts away from it, like a second product, a side story or a shot that’s only there because it looked nice, makes the viewer wonder where it’s going, which is usually the moment they scroll. Save good off-topic clips for another Reel.
Leave text, music, transitions and colour until later. Polishing a clip that gets cut is wasted time, and it’s much easier to judge the length and flow of a Reel when nothing distracts you from the core footage.
Step 3: Cut Every Pause
Remove every silence, breath, “um” and any mistakes from the talking, between sentences and inside them, so the Reel goes from one word to the next without a gap. Of all the steps, this one changes how professional a Reel feels the most. People tend to skip it because pauses don’t sound wrong while you’re recording, but they are extremely noticeable when you’re watching a reel for the first time as a customer.
The easiest way to find them is to look at the audio waveform. Zoom in on the timeline until you can see the shape of each word, and the flat stretches between them are the pauses. Split the clip at both ends of each one, delete the gap and close it up, leaving two or three frames before each word so the first letter doesn’t get clipped. Restarts go too: if someone says “we bake every, we bake all our bread fresh every morning”, keep only the clean version.
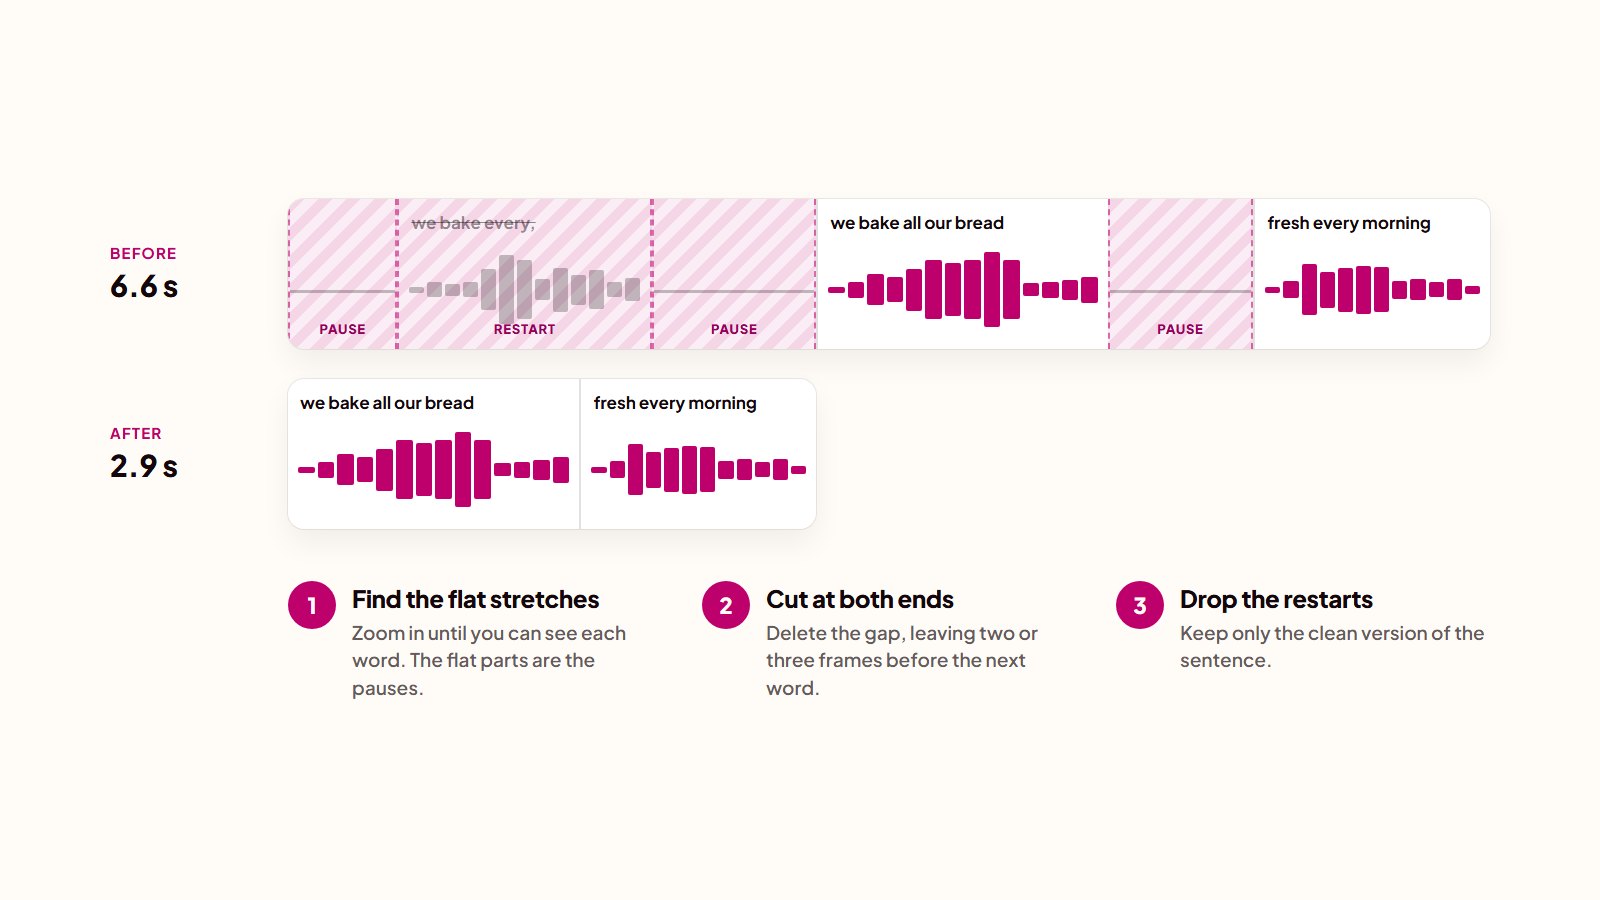
Premiere Pro can find and delete pauses for you through its text-based editing, and some phone apps have something similar, but check the result by ear, because automatic cuts tend to leave half a breath in one place and cut into a word in another.
The finished Reel should feel a little too fast while you’re editing, because viewers on a phone are one swipe from the next Reel and have far less patience than you do at your desk. If the speaker’s head jumps between clips, zoom in slightly on every other clip instead of putting the pauses back.
Step 4: Keep Something Changing on Screen
Every second or two, the picture should do something new, because a viewer’s eyes need a reason to stay as much as their ears do (yes, human attention spans are that cooked). These are the four changes we use most:
- A punch-in. Scale the next clip up by 10 to 20 percent so it looks like a closer shot. It works with footage from a single camera and hides the jump cuts from step 3.
- Extra footage over the talking. While the voice carries on, cut to what’s being talked about, like the product, the hands making it or the space. Editors call this b-roll.
- A new angle. If you filmed the same moment from two positions, switch at the end of a sentence.
- Text on a key word. A number, a price or a product name appearing as it’s said, which also helps people watching without sound.
Let the changes follow what’s being said, so a cut lands at the end of a sentence or on the word that matters, because cuts at random points make a Reel feel restless. Use a plain cut everywhere except the two or three transitions that belong to your look (step 8).
The extra footage has to come from somewhere, so the habit that makes this step easy starts on the filming day: after every shoot, film ten seconds each of the product, hands at work, the space and the people in it, and you’ll use it in plenty of later Reels too.
Step 5: Put the Hook on Screen in the First Second
You planned the hook when you wrote the script, and in the edit your job is to make sure nothing stands between the viewer and it. Move your strongest shot to the start so the Reel begins in the middle of the action, and remove anything that delays it: no fading from black, logos, slow shots of the shop front, or the half second before the speaker opens their mouth.
The title hook should be on screen from the first frame instead of animating in, because by the time it arrives many viewers have already scrolled on (if you really want an animation, make it very short). Make it big enough to read at a glance, keep it to one or two short lines, and place it in the upper or middle part of the screen, inside the safe zone. Leave it up long enough to read twice, and on short Reels for the whole video.
If the Reel has a voice, the first word should come within the first second, and if it has music, the beat should start straight away, because viewers with the sound on decide just as quickly as the ones with it off.
Step 6: Add Captions and Text Inside the Safe Zone
Every Reel with talking needs captions, because plenty of people watch with the sound off, on the bus, in a waiting room or in bed next to someone sleeping. The quickest way is to let your editor generate them, since Edits, CapCut and Premiere Pro all turn speech into captions in seconds. Read them through before you export, though, because automatic captions regularly get names, dishes, street names and local words wrong.
Use a clean, bold font with a light outline or shadow so it stays readable over any background, and show two to five words at a time. Highlighting each word in your brand colour as it’s spoken is a popular style that also keeps the eye moving.
Then check the placement against your overlay. Captions work best just below the middle of the screen, and the title, prices and labels go anywhere the overlay shows as clear, because text half hidden behind the like button might as well not be there. Keep it to the title at the top and the captions below it, since people who see three pieces of text at once read none of them properly.
Step 7: Add Music and Sound
The voice carries the message, and so is very important to get right when editing reels / short form content. Most editors have a noise reduction or voice enhancement option, like Premiere Pro’s Enhance Speech, which takes hum, wind and room echo out of phone audio. Use it gently, because too much makes the voice sound robotic.
Pick music whose pace matches the Reel, upbeat for a quick product Reel and calmer for a behind-the-scenes story. While someone is talking, keep the music around -20 to -25 dB, with the voice peaking around -6 dB, and check it on your phone’s speaker, where a voice gets drowned out much more easily than on headphones. A soft whoosh on a transition or a click when a price appears makes the edit feel finished, as long as the effects stay quiet and few.
Be careful where the music comes from, because a business account can’t use just any song. Instagram limits its music library for many business accounts, CapCut’s own music is licensed for personal videos only and its Commercial Sounds can only be posted on TikTok, and Meta’s free Sound Collection can only be used on Meta’s apps. If you post the same Reel on Instagram and TikTok, the safest way is to export it without music and add a track inside each app from the library that app offers your account. Music from the wrong library can get a Reel muted, though in our experience that rarely happens to an ordinary organic Reel.
Step 8: Use the Same Look on Every Reel
When every Reel shares the same fonts, colours, caption style, transitions and colour grade, people who have watched one recognise the next before they see your name, and that recognition is what slowly turns viewers into followers. Decide on these once and write them down:
- Fonts: one for titles and one for captions, bold and simple so they can be read in a second.
- Colours: your brand colours for titles, highlights and the backgrounds behind text.
- Caption style: the same size, position and highlight colour every time.
- Transitions: the two or three you like best.
- Colour grade: the same filter or adjustment on all footage, so Reels filmed on different days still look like they belong together.
The simplest way to keep it works in any app: keep a finished Reel as your master, duplicate it for each new one and swap in the new clips, so every font, colour and position stays where it was. When you change the look, change it on purpose and all at once, because a style that drifts a little with every Reel never becomes recognisable.
Step 9: Export and Check It on Your Phone
Instagram compresses every upload, so the cleaner the file you give it, the better the Reel looks afterwards. We export as MP4 with H.264, 1080 by 1920, the same frame rate as the project and a bitrate of around 15 to 20 Mbps, which in CapCut and Edits means choosing 1080p and the highest quality option.
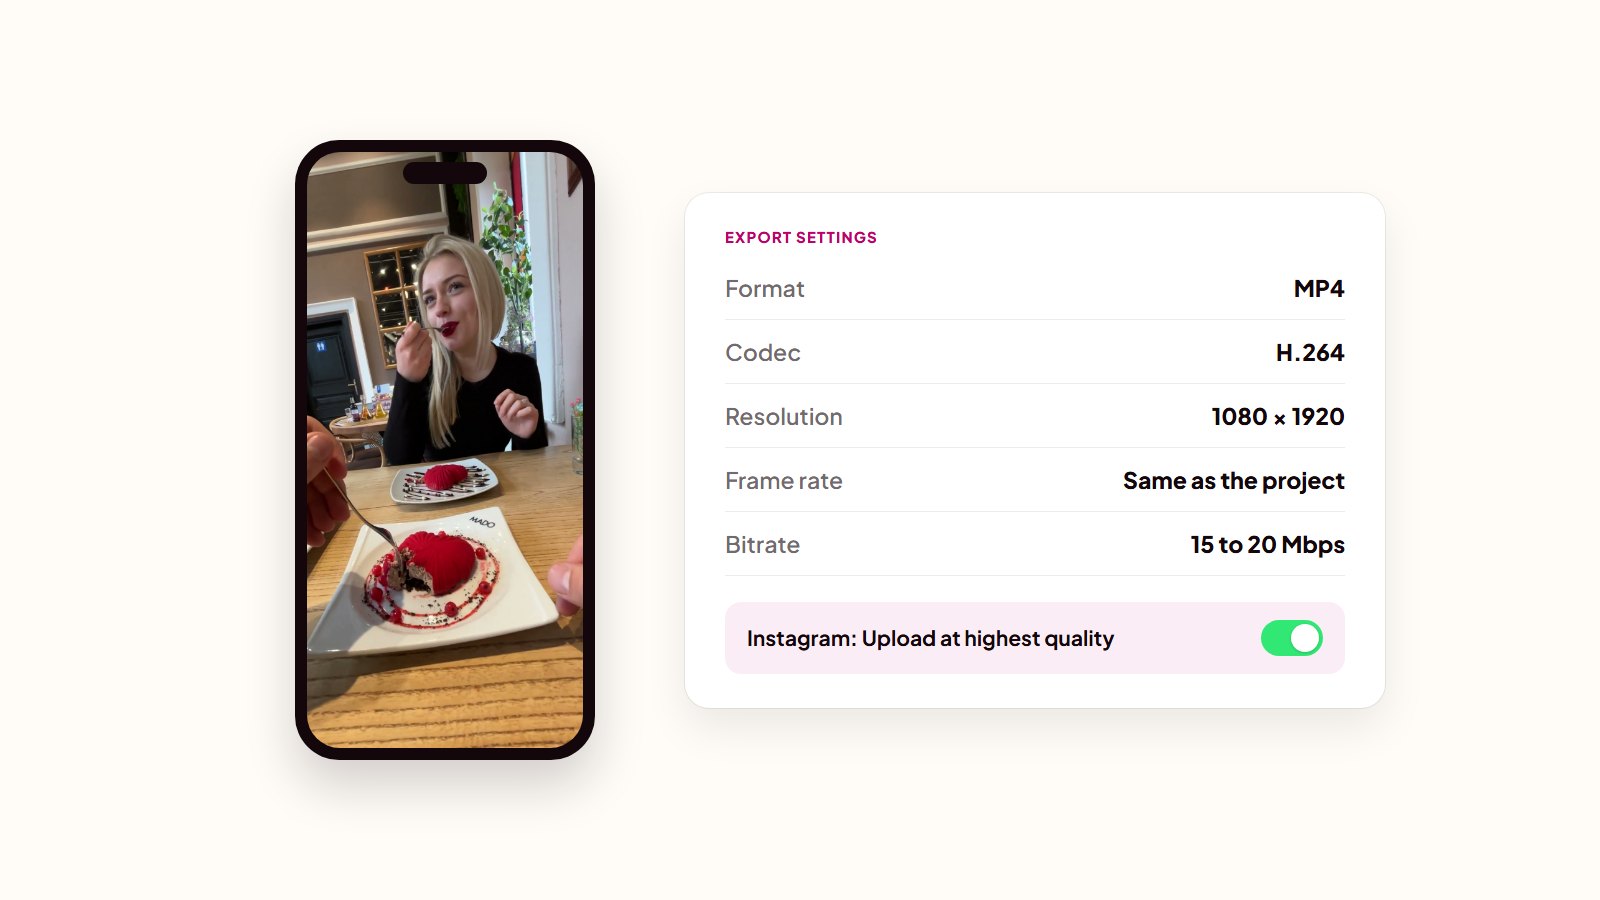
If you edited on a computer, move the file to your phone by cable, AirDrop or a cloud drive, never through WhatsApp or Messenger, which shrink videos. In Instagram, turn on “Upload at highest quality” under “Data usage and media quality” in the settings.
Then watch it on your phone the way a viewer would. With the sound on, check that every word is clear over the music, and with the sound off, check that the title and captions tell the story on their own, that no text is hidden behind the buttons and that nothing is misspelled. It’s tempting to skip this when the Reel looked fine on your computer, but trust us on this, you will avoid many mistakes if you don’t skip the rewatch.
Which App Should You Use to Edit Reels?
For most businesses editing on a phone, Edits is the best place to start: it’s Instagram’s own editor, it’s free, and it exports without a watermark. Every step in this guide works in any of the apps below.
| App | Price | Runs on | Automatic captions | Best for |
|---|---|---|---|---|
| Edits | Free | iPhone, Android | Yes | Editing on your phone and posting to Instagram |
| CapCut | Free, with a paid Pro plan | iPhone, Android, computer, browser | Yes | More effects and templates, posting to TikTok |
| Instagram’s own editor | Free | Inside the Instagram app | Yes | Quick trims and simple Reels |
| Premiere Pro | Adobe subscription | Computer | Yes | Editing Reels every week |
| After Effects | Adobe subscription | Computer | No | Animated text and graphics |
Edits
Instagram’s standalone editor covers everything in the nine steps, with a proper timeline, automatic captions and exports without a watermark. It’s free at the moment and available in Bosnia and Herzegovina and Norway, and if you mainly post on Instagram, it’s the one we’d recommend.
CapCut
CapCut has more effects, templates and caption styles than Edits, but a business needs to read its licence first. Fonts, effects and templates can only be used commercially when they’re marked “commercial use”, one unmarked element makes the whole video non-commercial, and its music library is for personal videos only. Paying for CapCut Pro doesn’t change that.
Instagram’s Own Editor
The editor inside the Instagram app is fine for trimming a quick Reel and adding text, but cutting pauses precisely and keeping a consistent look is much harder there than in a dedicated editor.
Premiere Pro and After Effects
These are what we edit client Reels in, with Premiere Pro for cutting, captions and sound, and After Effects for animated text and graphics. They take time to learn and cost a monthly Adobe subscription, so they make sense once you edit several Reels a week.
How Long Does It Take to Edit a Reel?
Editing a standard Reel, with several shots, a title hook, captions and music, takes us about 1-6 hours once the footage is filmed. A simple Reel with one setup and text on screen takes around an hour, and a complex one, with talking to camera, extra footage and motion graphics, can take a few hours or even more.
Together with scripting, editing takes up most of the five to six hours a standard Reel needs from script to finished edit, as we break down in our guide to making Reels for your business. Your first few Reels will take noticeably longer, because every decision is new, and the time drops quickly once your look is saved as a master Reel and you can spot pauses on the waveform at a glance.
When to Send Your Footage to an Editor
If you’re happy filming your own Reels but the editing is eating your evenings, you can hand over just the editing. You film and send us at Everline Media the footage, and you get back a finished Reel with captions, sound and your look, ready to post.
It usually makes sense once you post more than one or two Reels a week, or when the editing is the reason your Reels keep getting pushed back. Editing only costs €70 per video, or €600 for ten, and you post the Reels yourself. If you’d rather hand over the filming and posting too, our social media and video packages cover the whole process, from the content plan to the monthly report. We break down what goes into Reel prices in our guide to short-form video pricing.