Reels are the part of Instagram that reaches people who don’t follow you yet, and we at Everline believe that they are THE way to Win on Instagram. The platform’s algorithm shows them in the Reels tab and on Explore to anyone it thinks will watch, which makes them the cheapest way for a local business to get in front of new customers.
Most owners who try them post a handful, it doesn’t go quite as they imagined, and they quit shortly after, never to return. If you are one of those business owners, fear not, because here is our guide to filming reels and short form video for your business, from a Digital Marketing Agency that managed and created content for dozens of business accounts across various niches:
We get that creating social media content for your business is hard, and that is usually what suffers when you get busy with…well…actually running your business. The easiest way to make Reels for your small business consistently is to run your short form video production as a monthly cycle: study what already works in your industry, pick two to four themes, plan the month around the dates your customers care about, and script each Reel starting with its first three seconds. Then film the batch in one session, edit it for retention, post it on every platform your customers use, and build next month’s plan on what performed best.
This guide is the process we use when we make Reels for clients. Below are the nine steps, what each one gives you, and how long the work usually takes when you do it yourself.
How to Make a Reel for Your Business in 9 Steps
- Research what already works. Research 20 to 30 Reels or short form videos from your industry that performed well and note why you think each one worked.
- Pick your content pillars. Choose two to four themes that every Reel your business is going to publish must come back to.
- Plan the month. Create a content calendar, outlining what days / times you are going to publish.
- Write the hooks. Once you know which video ideas you are going to create, decide what happens in the first three seconds of each before you write anything else.
- Script the rest. Write the body (what you will say), the on-screen text and one call to action.
- Film in batches. Shoot a whole week or month of Reels in one session on your phone.
- Edit for retention. Cut every pause, add captions and keep all text inside the safe zone.
- Upload and distribute. Post each Reel on Instagram, TikTok, Facebook and YouTube Shorts on a fixed schedule.
- Double down on what worked. Build next month’s plan from your best-performing Reels.
Now, if you’ve tried filming reels before, you know it’s not as easy as that. But again, fear not, because we will go into each of the steps in more detail:
Step 1: Research What Already Works in Your Industry
Start by finding Reels in your industry that already perform well, because they show you what your customers stop scrolling for before you spend any time filming. Search Instagram and TikTok for your product and your competitors, look at what they and other similar businesses post, and save the Reels that clearly outperformed the rest on the account they were posted on.
The quickest test is the gap between views and followers. A Reel with 200,000 views on an account with 5,000 followers reached people who had never heard of that business, which is exactly what you want your own Reels to do. A Reel with 200,000 views on an account with 2,000,000 followers mostly reached people who already follow it, and so doesn’t necessarily mean that the reel itself was good, despite getting a good amount of views.
Save 20 to 30 of these into a collection, and for each one write down four things:
- The hook: what happens in the first three seconds
- The format: talking to camera, a product close-up, how something is made, a before and after
- The length: how many seconds it runs
- Why it held you: the moment you decided to keep watching
Look beyond your direct competitors as well. Food creators often shape what people expect from food content more than other restaurants do, so a café can learn as much from them as from the café down the street.
You end up with a saved collection and a page of notes, on which every step after this one depends.
Step 2: Pick Your Content Pillars
Content pillars are the two to four themes that every Reel you post comes back to. They make your account recognisable, because people start to know what they’ll get from you, and they give you a steady supply of ideas, because every pillar keeps producing new Reels. This is part of what gives your Instagram account an identity.
Choose them by putting your research notes next to the strongest aspects of your business. The formats and topics that kept showing up in the best-performing Reels tell you what your audience watches, and the reasons customers choose you over the place next door tell you what only you can show. A good pillar sits where those two things overlap, and it should give you at least ten Reel ideas the moment you write it down. If you can’t think of ten, your pillars are too narrow.
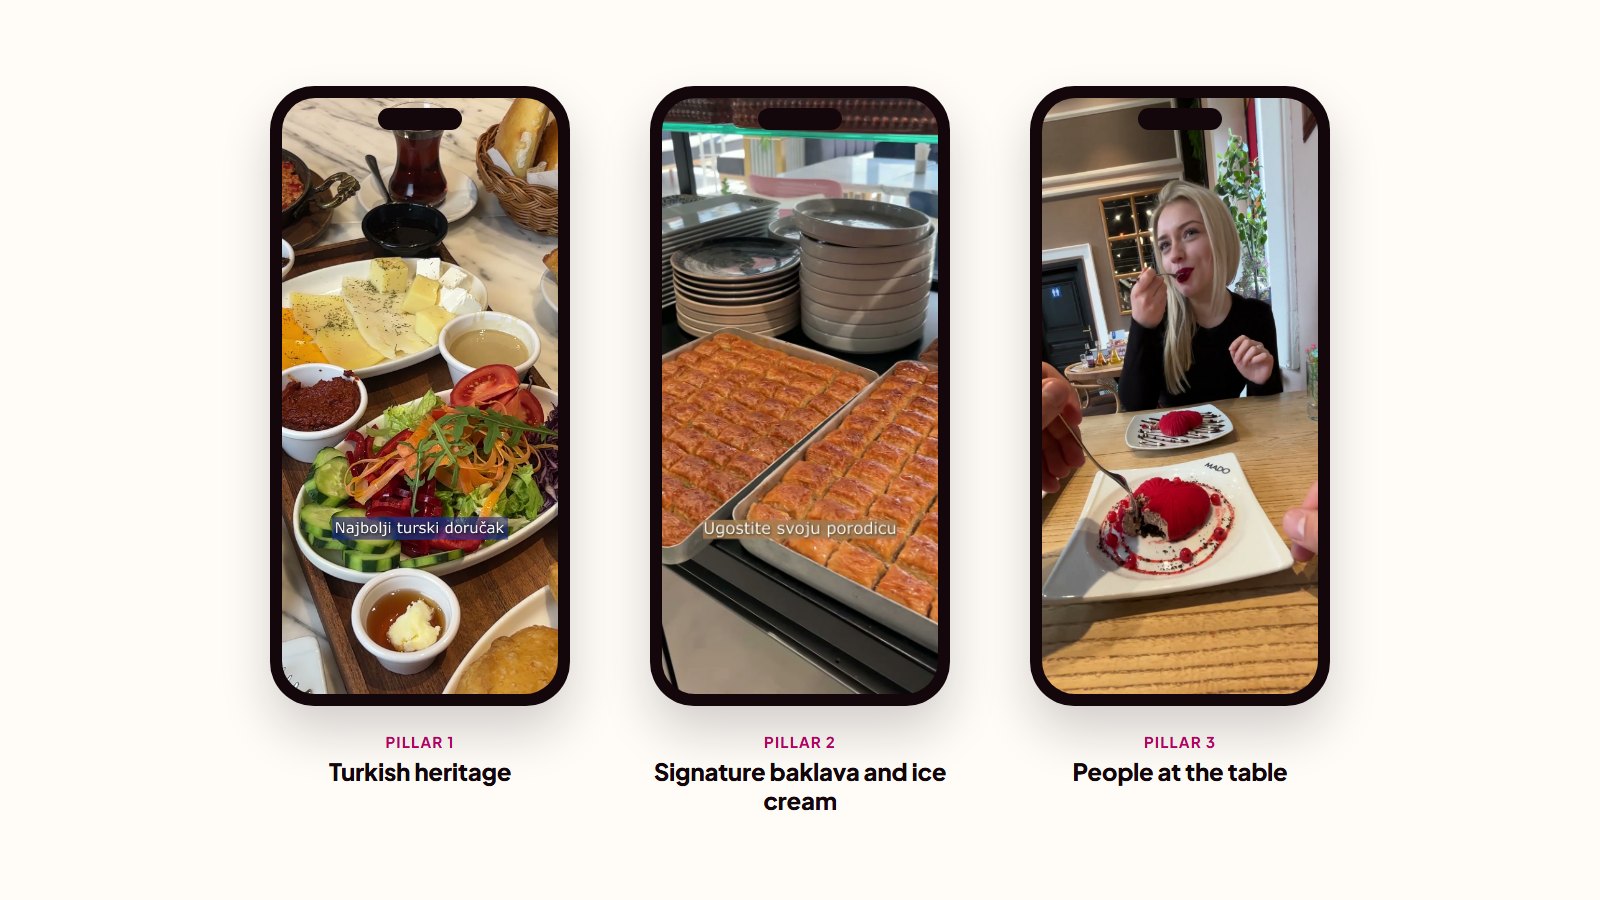
As an example, for Mado, one of our clients, the three pillars were Turkish heritage, the signature baklava and ice cream, and families spending time together in the restaurants. The first gave us Reels about the Turkish breakfast tradition, the second gave us close-ups like pistachio baklava cut piece by piece, and the third gave us Reels built around people at the table, such as a Valentine’s Day date. Each theme was specific to Mado’s brand identity, and together they covered everything the restaurant wanted people to know.
Keep sales out of your pillars. “Offers” or “new products” can’t be a theme, because people follow accounts that show them something worth watching, and a promotion lands better when it sits inside one of those themes than being a theme on its own.
You might end up with two to four named pillars, each with a list of ideas under it. This list is what we take to the next step.
Step 3: Plan the Month
Plan the month by putting your Reels on a calendar and deciding which days you are going to post. It helps if you plan your reels next to the dates your customers already care about: holidays, local events, the change of seasons and your own busy periods. A Reel about something people are already thinking about that week gets watched and shared more, and in our experience the platforms push it further as a result.
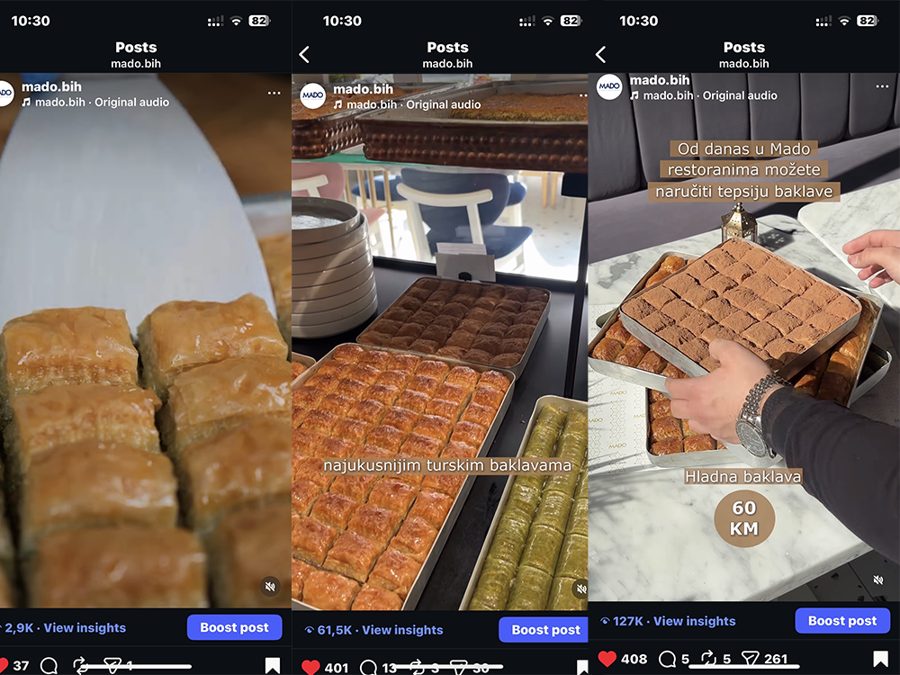
We saw this clearly with Mado, the same client from earlier. Across the months we ran their account, the Reels that performed best were the ones timed with Ramadan and Eid, the two periods their audience cared about most. A seasonal campaign we ran for them just before Eid racked up over 310,000 views across 7 days, fully organically with 0 ad spend, and sold out their entire stock.
A similar thing happened to us when managing the pages of Caribou Coffee. A random Eid meme made in 8 minutes ended up outperforming ten previous videos we spent much more time on, and we reckon it was all because the meme was culturally relevant at the exact time it was posted.
But I digress, back to reel production. Everything is easier when planned, and so you should build your posting calendar around some dates that are important for your audience. Those might be:
- Holidays and religious occasions your customers celebrate
- Local events, such as festivals, sports matches and markets
- Seasons, like the first warm weekend or the start of the school year
- Your own dates, such as a new menu, a product launch or an anniversary
Then work backwards from the big ones. A single Reel on the day itself is easy to miss, so give important dates a run of Reels that builds towards them. For Eid, we released five Reels for Mado over the seven days before the holiday, each one adding to the last. Fill the remaining slots with Reels from your pillars at a pace you can keep up; we usually do three a week for our clients.
A simple spreadsheet is enough: add one row per Reel, with a date, a pillar, the idea and a column for the hook, which you’ll write in the next step.
You end up with a calendar that holds every Reel for the month, with its date and its pillar.
Step 4: Write the Hooks
The hook is the first three seconds of a Reel, and it decides whether someone keeps watching or scrolls past. Write it before anything else, because everything that follows only gets seen if the hook works.
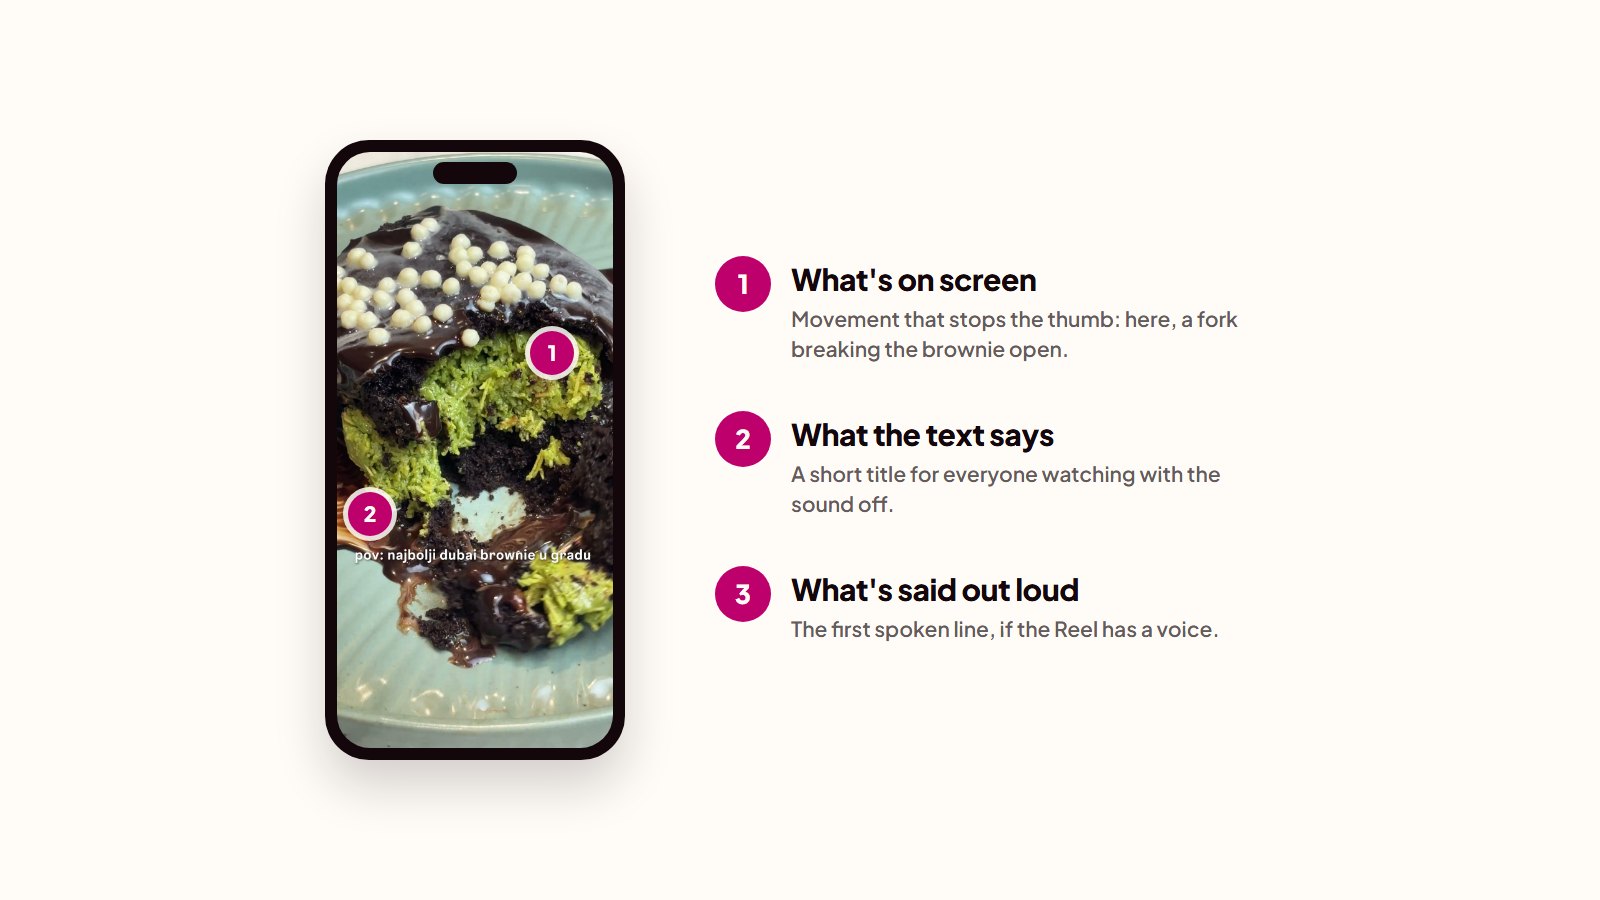
In our scripts, most hooks have three layers that work together:
- What’s on screen: movement or an image that stops the thumb, like a knife going through a tray of baklava
- What the text says: a short title on screen, because many people watch without sound
- What’s said out loud: the first line (if the Reel has a voice)
The on-screen title is the one we rarely skip. Most Reels we edit have a visible title hook, since it’s the only layer that reaches people who have the sound off. You might notice I keep saying “most”, “usually” and “almost every” a lot. That is because social media rules are rarely absolute, and there are times they can be broken. However, that is something you will learn with time, as you start creating short form video.
A few hook patterns work especially well for local businesses:
- Show the result first. Open on the finished dish, the full tray or the finished haircut, then show how you got there.
- Ask what the viewer wants to know. “How many layers are in one piece of baklava?” creates a curiosity that makes viewers stay to learn the answer
- Speak to one person. “If you’re planning a date this weekend” filters for people who are planning a date this weekend, making them specifically less likely to scroll.
- Start in the middle of the action. Cut straight to the pour, the sizzle or the reveal, with no build-up, for an immediate visual hook.
The most common mistake we see from businesses is opening with the logo, a slow shot of the shop front or “Hi, welcome to”. Those first seconds are what the viewer judges the whole Reel on, and simply adding your branding gives them no reason to stay. They scroll, and your reels perform poorly.
Write three to five hooks for each Reel and pick the one that makes you most curious when you read it aloud. Your research notes from step 1 help here, because they show which hook styles keep working in your industry.
You should end up with a hook, in all three layers, for every Reel on your calendar.
Step 5: Script the Rest
The rest of the script covers everything after the hook: the shots, the words on screen or spoken, and one call to action at the end. Scripting it in advance is what makes batch filming possible, because whoever holds the phone knows exactly what to shoot.
Here are a few rules you should adopt to keep the script tight:
- Pay off the hook quickly. If the hook asks how many layers are in a piece of baklava, the answer can’t wait until the last second, lest your viewers will feel cheated, and that isn’t what you want.
- One idea per Reel. A second idea belongs in a second Reel, and you’ll need the extra content anyways if you keep posting long enough.
- Every shot earns its place. All shots must move the story forward, there shall be no dead weight on these ships.
- Keep it as short as the idea allows. But, length does depend on the format.
On-screen text should carry the key words for someone watching on mute, in short lines they can read in the time the shot is up.
End with one call to action, and match it to what the Reel is for. A short form video meant to reach new people can ask them to follow, a useful one can ask them to save it, and one about a dish or an offer can ask them to come in. Asking for three things at once usually gets you none of them.
You end up with a one-page script for every Reel: the shots, the text, the voice and the call to action.
Step 6: Film in Batches
You should film a whole month of Reels in one or two sessions, working through your scripts one after another (this is what significantly speeds up the whole process and keeps the time investment manageable). Most of the effort in filming goes into setting up the light, the space and the props, so doing it once for ten Reels saves far more time than doing it ten times for one. Filming is usually the quickest part of the whole process for us, because the scripting has already decided every shot.
An iPhone is enough. A proper camera helps, but Instagram and TikTok compress every video you upload, so the difference is much smaller on the platform than you might think by seeing the camera screen. What matters more is the setting inside Instagram that uploads at the highest quality, which is switched off by default, so turn it on before you post anything.
A few basics make phone footage look professional:
- Film vertically, in 9:16, since that’s the format Reels are shown in.
- Wipe the lens. A phone lens picks up grease from your pocket, and it softens every shot.
- Use daylight. Film near a window and switch off overhead lights that give a different colour.
- Keep the phone still. A small tripod helps, and leaning on a counter works when you don’t have one.
- Move away, then zoom in. Talking head videos look much better if you move further away, then zoom back into the person speaking. For food and drinks as well, close-ups of textures and steam are what make food and products look good on a small screen.
Group the scripts by location and setup, so everything at the counter gets filmed together before you move to the kitchen. Once the scripted shots are done, film extra footage: close-ups, details, the room filling up. You’ll use it to cover cuts in the edit and to build more Reels later. If customers appear in a shot, ask them for permission before editing or uploading.
For Reels where you talk to the camera, film each part in one continuous take and simply repeat a line when you stumble, since you will cut the pauses and mistakes out during editing. If you feel stiff on camera, give your hands something to do, such as cutting fruit, pouring coffee or plating a dish. Filmmakers use the same trick with actors, because a simple task makes people speak more naturally.
You should end up with all the raw footage for the month, labelled by Reel/ short form video.
Step 7: Edit for Retention
Editing for retention means cutting the Reel so people are more likely to watch it to the end, because watch time is one of the main signals Instagram uses to decide who else sees it. This is where most of the time goes. Together with scripting, editing takes up far more of our hours than filming does.
At Everline Media, we edit in Premiere Pro and After Effects, and that’s what we recommend if you’re serious about video. CapCut is good enough to make decent Reels, though, and it’s free to start with, so don’t let the software stop you. We compare the apps and go through our whole editing process step by step in our guide to editing Reels.
These are the rules from our own editing guidelines:
- Cut every pause. Raw footage is usually one long take, and the gaps between sentences and words should all go, so the Reel moves quickly.
- Keep something changing on screen. A new shot, a zoom or a piece of extra footage over the talking holds attention between the hook and the payoff.
- Put a visible title hook on every Reel, as planned in step 4.
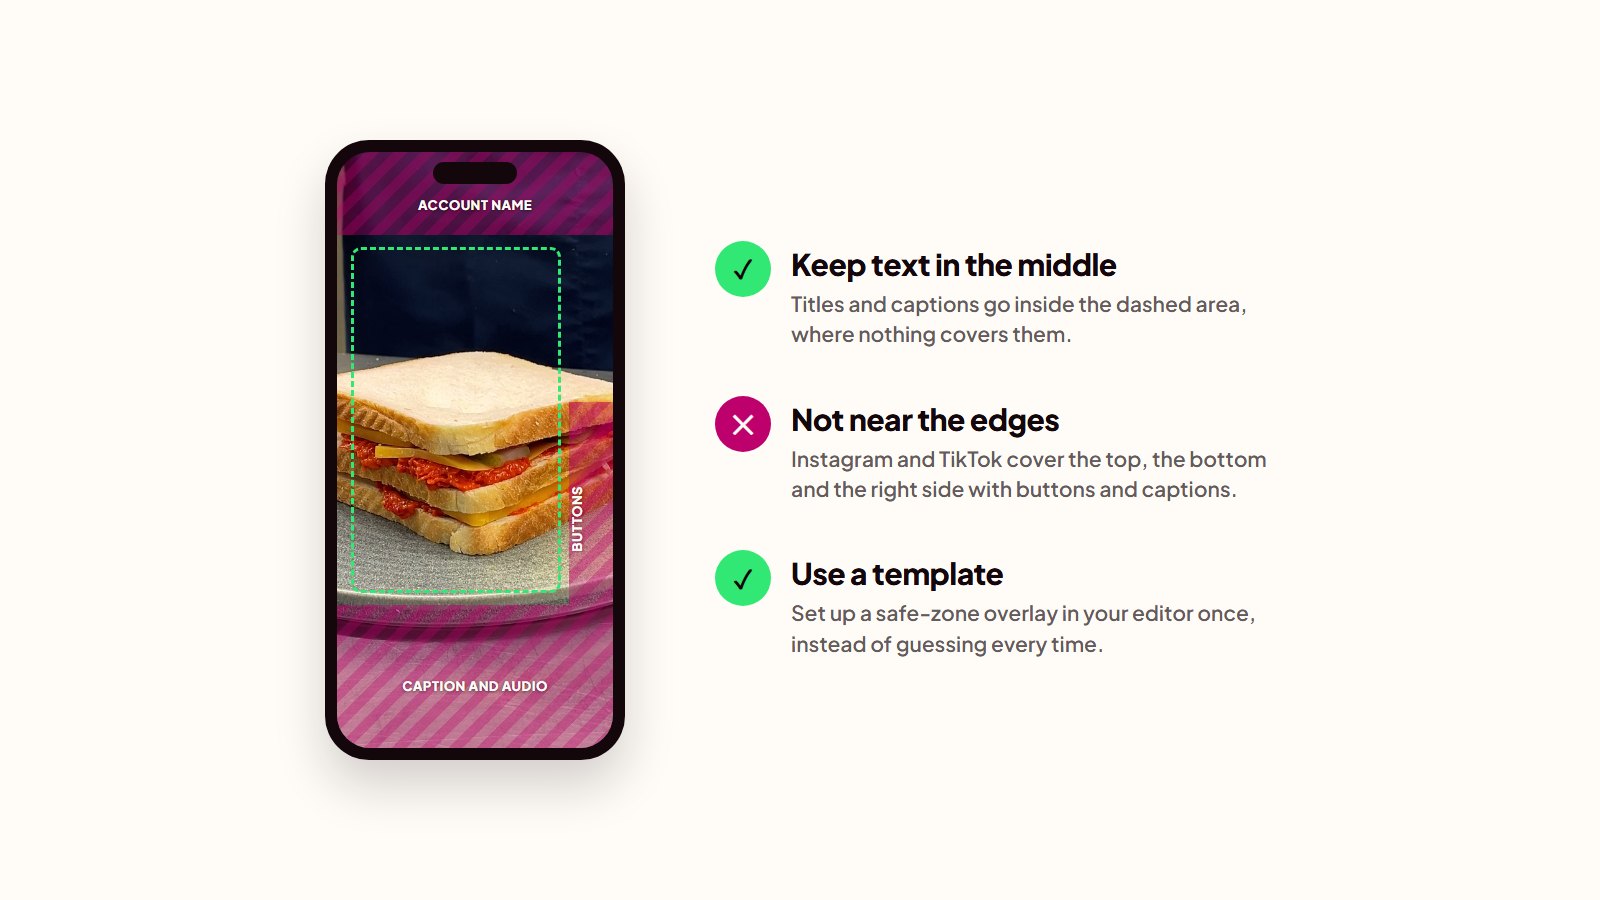
- Keep everything inside the safe zone. Instagram and TikTok cover the edges of the screen with buttons and captions, so text near the edges gets hidden. Use a safe-zone template in your editor rather than guessing.
- Use the same look every time. Pick one font for titles, one for captions, your brand colours and two or three transitions, and reuse them, so people recognise your Reels before they see your name.
Add captions to every Reel that has speech, since many people watch without sound. Most editors, CapCut included, generate captions automatically, but always read them through, because they get names, dishes and local words wrong.
Be careful with music. Business accounts on Instagram only get part of the music library, because most popular songs aren’t licensed for businesses to use, so the trending track you heard yesterday may simply not be available to you. Use the tracks Instagram offers your account or royalty-free music. We explain the limits, and what a business account can use instead, in our guide to music on an Instagram business account.
Export in 1080 by 1920 and check the finished Reel on your phone before it goes anywhere, since that’s the screen your customers will see it on.
You should end up with finished Reels, captioned and with music, ready to post.
Step 8: Upload and Distribute
Post each finished Reel on every platform your customers use, on a fixed schedule (as per the content plan you made earlier). The same vertical video works on Instagram, TikTok, Facebook and YouTube Shorts, so one edit can reach four audiences for the cost of a few extra minutes of uploading.
Don’t write off TikTok as a platform that isn’t popular in your city, or that is for teenagers. When we ran the aforementioned Mado’s Eid campaign, more than 94% of the TikTok audience for those Reels was in Bosnia, close enough to come in and order. For a local business, TikTok reaches local people.
Upload the clean file from your editor to each platform separately. Downloading a Reel from TikTok and reposting it elsewhere lowers the quality and carries the TikTok watermark with it, and Instagram has said it shows Reels with other apps’ watermarks to fewer people.
Give each post a little attention before it goes out:
- Write the caption for search. People search Instagram and ESPECIALLY TikTok like a search engine, so name the dish, the product or the service and where you are, in words a customer would type.
- Choose the cover image. It’s what shows on your profile grid, and a clean frame with the title looks far better than a random mid-blink still.
- Share it to your Story. Your Story reaches the people who already follow you, while the Reel works on reaching new ones.
Then stick to a schedule. Pick fixed days and times, and use Meta Business Suite to schedule Instagram and Facebook together, plus TikTok’s own scheduler, so the post still goes up even if you forget about it because of other business obligations. Still, you should stay around for the first hour after a Reel goes live and reply to comments, since early conversation helps it get pushed more by the platforms.
You should end up with every Reel for the month scheduled across your platforms.
Step 9: Double Down on What Worked
At the end of each month, find the Reels that performed best and build next month’s plan on them: the same topics and angles, in new variations. This turns a month of Reels into a content system that gets better the more you do it.
Look at these numbers for each Reel, in Instagram’s and TikTok’s own analytics:
- Views from non-followers, which show how far the Reel reached beyond people who already know you
- Watch time and how far people got, which show whether the Reel held attention or lost people after the hook
- Shares and saves, which show that someone found it worth sending to a friend or keeping
- New followers from the Reel, which show whether viewers wanted more from you
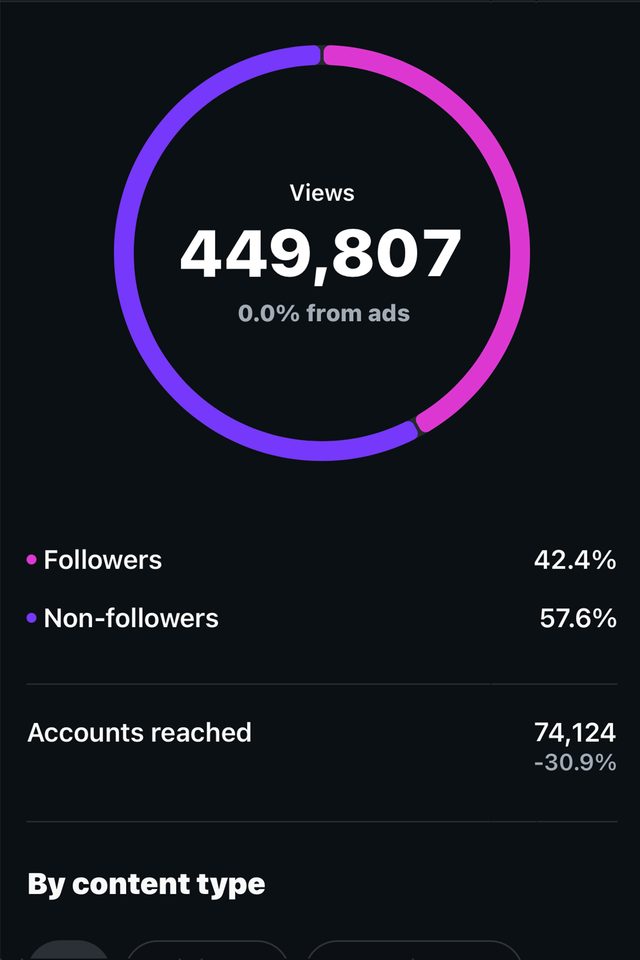
Likes are the least useful of the lot, because they’re easy to give and say little about whether someone will ever walk through your door.
Then look for patterns rather than single winners. One Reel can take off by luck, but if three Reels from the same pillar, with the same kind of hook or the same format all beat your average, you’ve found something to repeat. Make more of those with a new product or a new hook, and keep the part that worked. Give a weak idea two or three tries before dropping it, since one flop can be bad timing as much as a bad idea.
Some winners come back on their own schedule. Mado’s Eid run is a format that can be repeated every Eid, which comes twice a year, with new Reels built on what performed last time. Caribou’s CoffeeCast Series can be repeated on a fixed schedule, and we did those episodes once a week.
Take these notes back to step 3 and plan the next month with them, and add any new examples you saved to your research from step 1.
You should end up with next month’s plan, hopefully even better than the first.
How Much Time Reels Really Take
A good-quality Reel takes us about five to six hours from script to finished edit. The range is wide, though: a simple Reel can be done in one or two hours from start to finish, and a complex one can take fifteen to twenty.
| Type of Reel | Example | Time from script to finished edit |
|---|---|---|
| Simple | One setup, a few shots, text on screen | 1–2 hours |
| Standard | Several shots, a title hook, captions and music | 5–6 hours |
| Complex | Several locations, talking to camera with extra footage, motion graphics | 15–20 hours |
Most of that time goes into scripting and editing. Filming is the smallest part, which surprises most owners, who expect the opposite.
At three standard Reels a week, that adds up to roughly 15 to 18 hours a week, or about two working days, before you count the monthly research, planning and review. That’s the real cost of doing it yourself, and it’s worth knowing before you commit to a schedule you can’t keep.
Frequently Asked Questions
How often should a business post Reels?
Should a business use Reels or Stories?
Can I make Reels for my business without showing my face?
Do Reels actually bring in customers?
What is the best app for editing Reels?
How much does it cost to have Reels made?
When to Hand It Off
Hand your Reels to someone else when the schedule starts slipping or when the hours cost you more than the Reels bring in. A missed week of posting can quickly turn into a few months if you aren’t careful, and reviving a dead account is much harder than simply continuing to post (and continuing to post will bring you more money, too!)
All of this is the work we do. Our social media and video packages cover the whole cycle in this guide, from research to the monthly review, starting at €500 a month. If you’d rather keep running your own account and only need the production, we film and edit single Reels for €110 each, and edit footage you’ve filmed yourself for €70 a video. We break down what goes into those prices in what it costs to have Reels made.